MIL-PRF-23269G
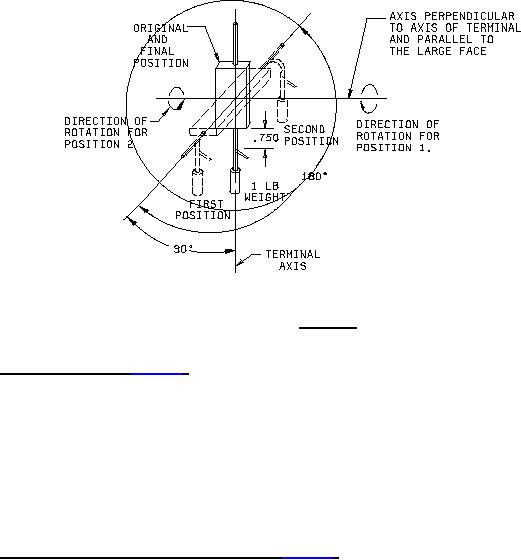
FIGURE 2. Bend test.
MIL-STD-202. The following details shall apply:
a.
Method of mounting: Not applicable.
b.
Test condition letter: D (100,000 feet).
c.
Tests during subjection to reduced pressure: a minimum of 150 percent - 2 percent of rated voltage shall
be applied between the terminals for not less than 1 second nor more than 5 seconds.
After the test, capacitors shall be examined for evidence of damage, arcing, and breakdown.
4.7.14 Temperature coefficient and capacitance drift (see 3.18). Capacitance shall be measured as specified in
4.7.5, except that measurements shall be made in the order and at the temperature shown in the following, at a
frequency of 100 kHz Ý10 kHz. The reference frequency at which measurements are made shall not drift more than
Ý50 Hz during the test. An accuracy of Ý0.025 percent of nominal capacitance +0.05 pF shall be maintained for
measurement of capacitance change.
a.
For qualification inspection: +25¯C, Ý2¯C; -55¯C +0¯C, -2¯C; -10¯C Ý2¯C; +25¯C Ý2¯C; +65¯C Ý2¯C; +85¯C
+2¯C, -0¯C; +125¯C +2¯C, -0¯C; and +25¯C Ý2¯C.
b.
For quality conformance inspection: +25¯C, Ý2¯C; -55¯C +0¯C, -2¯C; +25¯C Ý2¯C; +125¯C +2¯C, -0¯C; and
+25¯C Ý2¯C, respectively.
The measurement at each temperature shall be recorded when two successive readings taken at 5-minute intervals
at that temperature indicate no change in capacitance. The temperatures at the time of measurement shall be
measured at an accuracy of Ý1.0 percent of the temperature difference between the nominal test temperature and
the nominal reference temperature +0.5 ¯C.
16
For Parts Inquires submit RFQ to Parts Hangar, Inc.
© Copyright 2015 Integrated Publishing, Inc.
A Service Disabled Veteran Owned Small Business